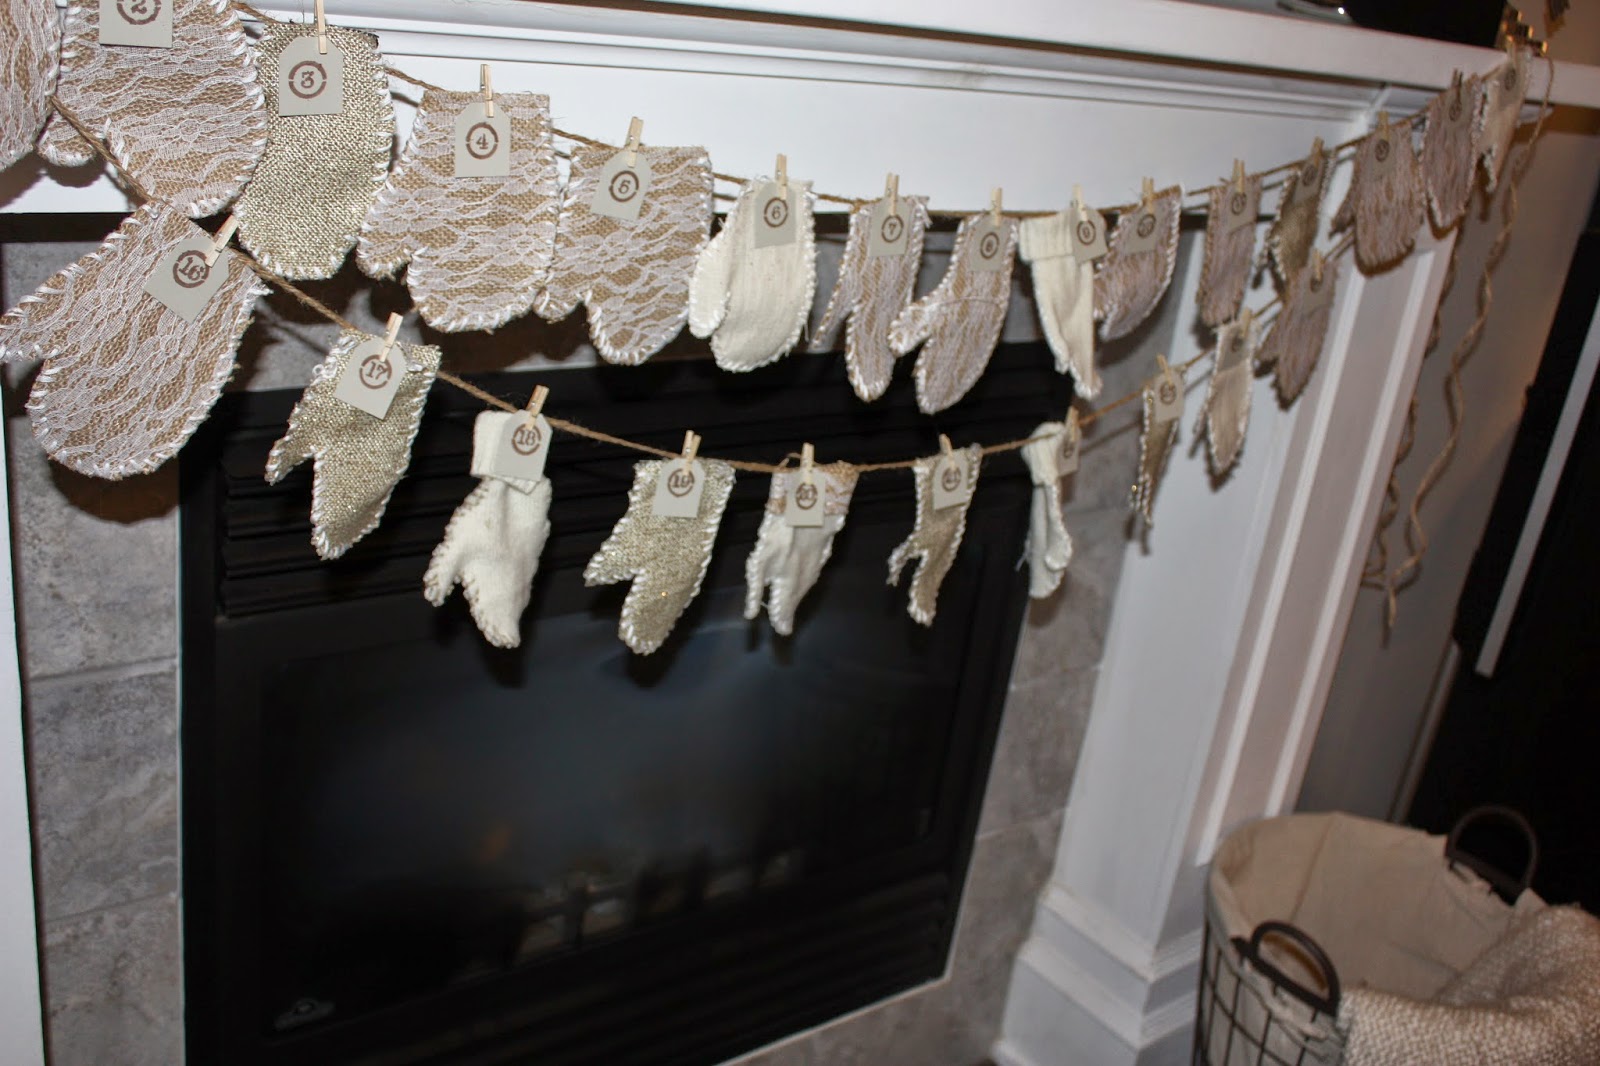
I'm always a fan of changing up my holiday décor each year and this year I decided to go more neutral, which of course meant burlap and linen! I had a picture in my head of creating a little bunting-style garland with a handmade, vintage-feel to it.
Here are the supplies I used:

~Various types of burlap and burlap ribbon: lace covered, lurex thread woven;
~ Linen ribbon
~Felted wool via an old sweater (not shown)
~Jute
~Miniature clothes pins (not shown here)
~ Embroidery floss
~Upholstery needle
~Scissors
~Sharpie or sewing marker or pen)
~Stencil
~Cardstock
~Tag punch
**Disclaimer: This is not a 15 minute craft. Hand stitching each mitten took a fair bit of time, but the actual steps are super easy and I was able to bust it out in 2 evenings of watching TV.
Here's how I created it:
1. Free hand an image of a mitten on the back (wrong side) of your fabric. (No photo of this since I was on a roll apparently...)
2. Fold the fabric in half and cut it out. This will result with two identical mittens.

3. Put the mittens bad side together so they match up and using embroidery floss & an upholstery needle, I used a simple whipstitch to sew them together. Leave the bottom of the mitten un-sewn so that you will be able to put stuff inside it.

Repeat this step 24 more times..... I used a variety of different fabrics. Some were easier to work with an produced prettier looking mittens, but I like that some are misshapen and a little wonky looking - I think it adds to the handmade appeal! The lace covered burlap was the best fabric to work with. The overlay made it the perfect amount of stiff, which made it easy to cut and stitch up. I also think it was the prettiest!

4. Use a stencil and a marker to create your little 1-25 numbers.

5. Use a tag punch to punch out each date.

6. Attach your number card and mitten to the swagged jute, alternating fabrics.

7. Gather up all sorts of little goodies to put in your mittens for daily treats. I used all sorts of little beauty products (lip glosses, mini lotions, nail art stickers) cause this one is going to be for ME!!

8. Stuff each and every little mitten with goodies that you can barely even wait to open, come December!

9. Easy Peasy and that's it!


Of course, I couldn't just leave it like that, so I spruced up the mantel with some garland and lights as well! Since I don't really do my Christmas decorating until December, I kept it simple and think this is perfect for Winter.


I really love how everything looks when the overhead lights are off and just the fireplace and garland lights are on - all glowy and cozy!


I'm super happy with it turned out and am really glad I went with linen and burlap for this year!
I have a lot more crafts planned and will be featuring them shortly!


One of my favorite parts has to be the little differences in each mitten. Doing them freehand was risky as admittedly some are a little odd looking, but it definitely helped keep this looking handmade and almost vintage, which I absolutely LOVE!


Can't wait for December!! ;)


No comments:
Post a Comment